Ansible 실습을 위해 VM 3대를 준비합니다.
Control Node 1ea
Managed Node 2ea
OS : ubuntu 22.04
실습 환경 준비
1. ansible 설치
sudo apt update
sudo apt install -y ansible
2. 대상 서버 준비
# 제어 노드에서
ssh-keygen
# w1
ssh-copy-id w1@192.168.60.161
# w2
ssh-copy-id w2@192.168.60.162
실습
제어 노드에서 실시합니다.
1. 인벤토리 파일 생성
# ~/ansible/inventory.ini
[web]
192.168.60.160 ansible_user=w1
192.168.60.161 ansible_user=w2
2. 연결 확인
ping 모듈
ansible -i inventory.ini all -m ping
3. 명령어 확인
command 모듈
ansible -i inventory.ini all -m command -a "uptime"
4. Playbook 으로 Apache 설치
4-1. apache yaml 파일 생성
# ~/ansible/apache.yml

- name: Install Apache
  hosts: web
  become: yes
  tasks:
    - name: Install apache2
      apt:
        name: apache2
        state: present
        update_cache: yes
4-2. 실행
ansible-playbook -i inventory.ini apache.yml
5. 웹페이지 배포
5-1. deploy.yaml 파일 생성
# ~/ansible/deploy_index.yml
- name: Deploy index.html
  hosts: web
  become: yes
  tasks:
    - name: Copy index.html
      copy:
        src: ./index.html
        dest: /var/www/html/index.html
5-2. index.html 생성
# ~/ansible/index.html
echo "<h1>Hello from Ansible!</h1>"
5-3. 실행
ansible-playbook -i inventory.ini deploy_index.yml
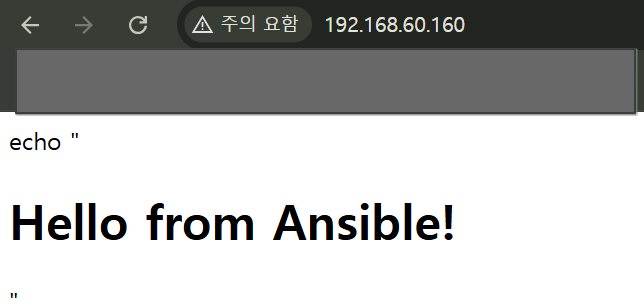
5-4. 대시보드 접속 확인

6. 핸들러(handlers)
변경된 경우에만 실행
6-1. site.yaml 파일 생성
- name: Update index.html and restart Apache if needed
  hosts: web
  become: yes
  tasks:
    - name: Deploy updated index.html
      copy:
        src: ./index.html
        dest: /var/www/html/index.html
      notify: Restart Apache

  handlers:
    - name: Restart Apache
      service:
        name: apache2
        state: restarted
6-2. 실행
ansible-playbook -i inventory.ini site.yml --ask-become-pass

7. 템플릿(Jinja2)
템플릿을 사용하여 동적 파일 생성
7-1. templates/index.html.j2 파일 생성
서버 별로 hostname 다르게 출력
# ~/ansible/templates/index.html.j2

<h1>Welcome to {{ inventory_hostname }}</h1>
<p>This page was deployed by Ansible.</p>
7-2. site_template.yaml 파일 생성
# ~/ansible/site_template.yml
- name: Deploy templated index.html
  hosts: web
  become: yes
  tasks:
    - name: Copy templated file
      template:
        src: ./templates/index.html.j2
        dest: /var/www/html/index.html
7-3. 실행
ansible-playbook -i inventory.ini site_template.yml --ask-become-pass


8. 롤(Roles)
복잡한 환경에서 코드를 체계적으로 관리하고 재사용하기 위해 구조화된 방법입니다.
8-1. 롤 생성
ansible-galaxy init apache-role
8-1-1. 구조
# 예시
apache-role/
├── tasks/
│   └── main.yml          # 해야 할 작업
├── handlers/
│   └── main.yml          # notify된 핸들러들
├── templates/
│   └── index.html.j2     # 템플릿 파일
├── files/                # 단순 복사할 파일들
├── defaults/
│   └── main.yml          # 기본 변수
├── vars/
│   └── main.yml          # 변수 정의
8-2. main.yml 파일 생성
# ~/ansible/apache-role/tasks/main.yml
- name: Install Apache
  apt:
    name: apache2
    state: present
    update_cache: yes

- name: Deploy index
  template:
    src: index.html.j2
    dest: /var/www/html/index.html
  notify: Restart Apache
8-3. main.yaml 파일 생성
# ~/ansible/apache-role/handlers/main.yaml
- name: Restart Apache
  service:
    name: apache2
    state: restarted
8-4. use_role.yaml 파일 생성
# ~/ansible/use_role.yml
- hosts: web
  become: yes
  roles:
    - apache-role
8-5. 실행
ansible-playbook -i inventory.ini use_role.yaml --ask-become-pass
오류 1. sudo 를 쓰려 했으나, sudo password 를 설정하지 않아 에러 발생

해결 방법
1. --ask-become-pass 옵션 사용
명령어 실행 시 비밀번호를 직접 입력
2. user 에 sudo 권한 부여
보안에 주의해야 함
{user} ALL=(ALL) NOPASSWD: ALL
결론
적은 서버의 간단한 예제 실습을 하며 ansible 의 편리성에 대해 이해하였습니다.
머리보다 손을 더 많이 사용하는 단순 노동의 작업들에 본문 예제 보다 많은 서버들의 작업(ex. git pull 등) 이 필요하다면 ansible 로 편하게 작업할 수 있습니다.


